
Why is my generator not producing power?
Don’t (omit)panic if your generator is running but doesn’t produce power; we are going to provide you with the top 8 reasons and their solutions as well.
The most common reasons are tripped breakers, defective AVR, and loss of residual magnetism; however, sometimes you need to dig deep for diagnosing the actual cause.
Without further wasting time, let’s dive in:
Table of Contents
Why is my generator not generating power?
The following could be the major reasons for not working.
Tripped Breakers:
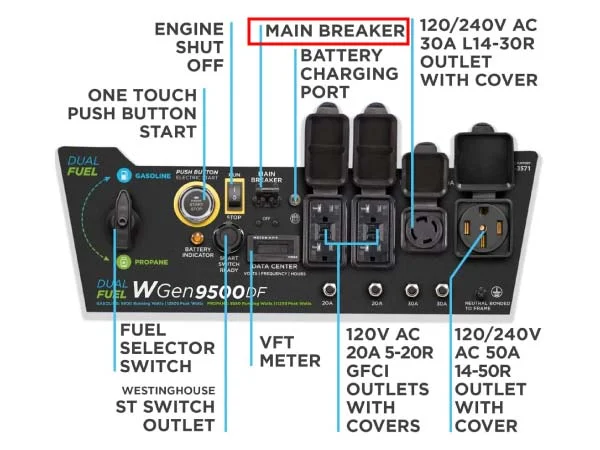
Breakers of the generator:
Let’s first make sure of the circuit breakers on the generator, and start by shifting them to the “ON” position; first, if they are in the “OFF” position you have to trip it up to reset the breakers.
Overloading of the generator causes the circuit breaker to disconnect the generator from a power box to avoid major damage.
For example, think you have a generator to operate an air-condition or equipment that has 2.5 kW of running watts and 3kw of starting watts; this will affect the current capacitance of 2kw of your generator. Every engineer knows nothing happens to a generator under such conditions, but the generator breaker trips off automatically to save the more “vital” parts of it.
After reducing the load, turn on one breaker, and connect the generator to the application. Your generator howls; you stopped generating too much power.
For safety reasons, GFCI breakers have come as an alternative to circuit breakers (fuses) rather than as a replacement for circuit breakers.
The reason for the incorporation of the GFCI breakers is to avoid fatal shocks (omit)by sensing the difference in the amount of current in the circuit.
Discovery is important in troubleshooting a ground fault circuit interrupter (GFCI) breaker:
Leeks in power cords, in case the power lines are fried, and the insulation is broken, you may easily change the cord and retry it.
It is possible that the GFCI outlet is fault, Plug an appliance into the outlet directly to confirm that the breaker is popped up, then replace the breaker.
At the small inlet of the GFCI breaker, you short circuit. As the breaker is too sensitive, it pops pretty quickly on sensing that a large amount of current is flowing.
NOTE: In an emergency, the circuit breakers are bypassed to complete my work, and it is quite risky, so please do not mess with it if you are not a technical expert.
Defective Outlets:
There is a third possible cause of a generator not getting enough power, and that can be checked by identifying bad/faulty outlets. Furthermore, ascertain that the (omit)power outlet is in(omit) good condition.
Press the generator’s switch (start/run), the circuit breaker is turned on ‘ON’ position, and use a multimeter, set up in continuity mode, to probe the right slot (black end) and left slot (red end).
Without further delay, set up an or easy way to check the outlets. You might have an issue with the outlets that could be responsible for noisy readings.
Loss of Residual Magnetism:
When you stop your generator totally, your generator always retains a minimum residual magnetism in the revolving coils. This is also called residual magnetism, which ultimately helps you an electromagnetic field for subsequent power generation.
Once the residual magnetic strength is missing, regeneration of power may not be possible in the same generator.
When the generator is not being used, it will experience a loss of residual magnetic field due to the long-time effect. When the generator is only turned for a longer time with no load or your generator is new, the residual magnetic field will also disappear.
In fact, what happened is that you connected a few devices that are on even when your generator is turned off, thus as a result, the residual magnetic field tries itself to generate some power and transfers it to the electric device.
There is not much mystery when it comes to restoring the generator magnetism. The steps to recharge a generator going forward revolve around using a power drill or a 12-volt battery, and here is how to do it.
How to Restore Residual Magnetism in a Generator?
Use a power drill to re-magnetize the generator as follows:
- A drill and a drill bit are used to re-magnetize the generator.
- Now, we start the generator, and it is compulsory to wear gloves when it is happening.
- You must include a battery pack and a drill and then hold down the trigger to power on the drill.
- Twist the chuck of the drill to the right with your hands. Feel free to use the protective gloves (in case you have a pair), else you can do it with something else.
- The drills are now powered, indicating successful magnetization. However, if it did not work as expected, it would be mandatory to repeat the procedure about 3-4 times.
- There are two ways to demagnetize the generator: firstly, through converting the 12 volts batteries’ power into magnetic power generation.
You need to follow these steps:
Pull off the alternator cover, which is essential for finding the two wires that loop the AVR to the brushes, before you can proceed to remove them from the brush holder. You must make sure that the positive is placed with the right end and the other negative end is the opposite. I would recommend that you take a picture for you to distinguish them with ease.
The power source is to be connected to an outlet to make things function.
Using a 12 volts battery and two small alligator clips is the only thing you need to do. Connect the +VE red terminal of the battery with the +VE cable on the rotor.
Start your device, turn the breaker on the power board. After that, grab the black alligator and clamp it on the negative −VE where the black cable is attached.
You can read through the tutorial guide regarding power systems to know-how on generating power using the generator with a twist of having it flashed for a different usage.
Poor Connections:
Take the outlets and the cables from the generator. If you find that any of them have physical damage such as cracked or burned insulation, they surely need to be replaced.
Should you detect any dirt or bugs as you inspect the generator outlets, whose plugs were attached, ensure to cleanse them from the lines as well.
Some breaks might occur in cords and also at outlets, which, of course, will send wrong signals to the GFCI breakers; the generator, therefore, will not produce power! – Which has to do with safety matters.
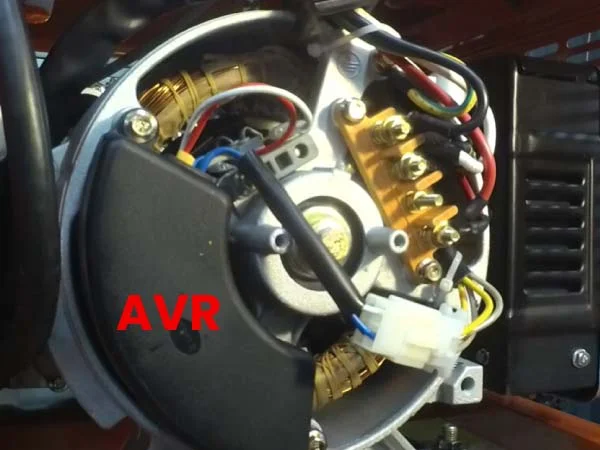
5. Defective or Busted AVR:

The key role of an automatic voltage regulator in connection with the generator
Providing constant voltages for the crucial appliances
Once the AVR in your generator becomes defective or shorts, you may not have an output voltage at all. The main location of an alternative voltage Regulator or an AVR for short, is the backside of your generator. You will take out the screws, and then you shall see the AVR unit as shown in the picture .
Disconnect the brushes cable by pulling the carbon brushes (carbon holder) from the carbon brush assembly and unhook the AVR.
You can carry the following tests to make sure you will fix the generator because of the AVR, brush, rotor or winding.
Testing of AVR, rotor, and windings: a multimeter could be a good tool in checking if the AVR, rotor, or winding was the problem.
My generator is an AVR model generator
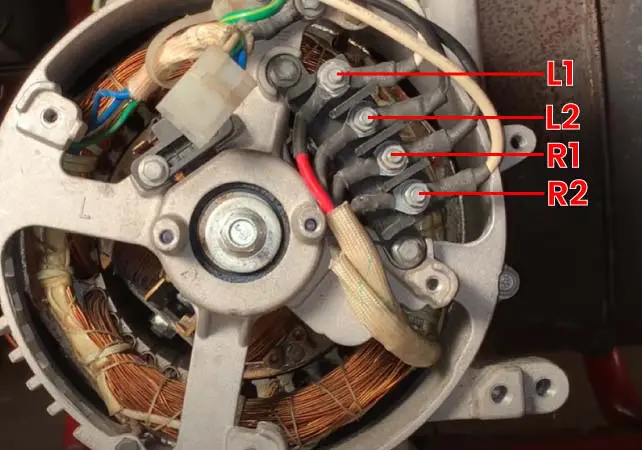
I will fire up the machine well to take the readings.
Reading No1: Using a multimeter, test the bushings, put the red probe in the left brush L (or +VE) on the +VE terminal. The red probe goes to the negative side (-VE). The red probe goes in the middle of the green strip of paper, and the black probe goes to the left inside (L1). The red probe goes between the green strip and the paper, while the black probe goes on the right side (L2). These are the R1 and R2 brushes.
Tips: The voltage reading should use the paper and switch of the brush. If the reading is high, then the brush needs replacement.
Generator AVR Testing
Running a multimeter R2 to G, L2 gets about 3-5 volts
This is how I do the megohm test: I place the red probe on R1 and L1 of the voltmeter. The voltmeter must read between 200 and 500 megohms to verify it is not blown.
Then you can kneel down to check if the generator is producing electricity using the front indicator.
Armature testing is more applicable to the compound generator.
Place the red probe of the multimeter on R1 and L1, the probe, the readings should be 0 volts.
NOTE: If you are getting incorrect readings from the winding, chances are your generator’s windings are gone.
In the following video, Generator Guru shows how to check the generator rotor and tell if it is causing the no output problem
Faulty Capacitor:
In the situation where it is exhibited that the capacitor is defective, unplug the generator and begin the procedure of having the faulty item disconnected from the rotor.
The capacitor is adjacent to the AVR position, the shiny box that is almost the same as the AVR. When you remove the end (omit)the rotor from the carbon brushes and connect a multimeter to them and then fire up the generator, you will get a reading lower than 5 volts. If such readings appear, then you have a faulty capacitor, which you must replace.
It obviously involves some risks:
Do not come in contact with the terminals with your bare hands; it may generate a shock.
Do not turn on the generator.
The Home in the Earth shared its knowledge with us in this video about changing the capacitor of a certain generator.
The Connection of Generator:
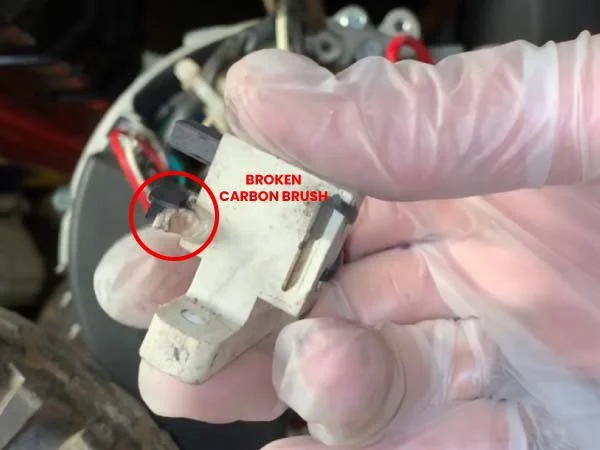
Carbon brushes are an integral part of power tools, producing electric current to power electric motors. They were created to carry current conduction between two rotating parts: the commutator of the
Generator and the windings. The AVR is located on the back part, and it is where the two AVR wires (a’ve and -Ve) are connected to the two carbon brushes. Finding and identifying it is one of the easiest tasks you can have in generator maintenance.
Remove the carbon brush assembly cover by taking the screw out of the top slot. Observe the carpet of (omit)carbon brushes removed from the generator:
Little size.
Worn-out.
Cracks.
Weak springs.
Copper wire
Burnt or melted.
Carbonate
Appearance of the carbon commune.
Outwardly, there is a defect in the carbon brush.
Burned Out Breakers:
Damaged circuit breakers, as they may pop up for unknown purposes, only bring more headaches at the end that will impasse the outlets of generators in transmitting power.
In order to make the correct repair for the faulty breaker, the generator should first be disconnected from the power, (omit)the control panel consisting of the breaker should be unbolted , and another breaker should be connected in terms of the wiring.
Verdicts:
Don’t (omit)panic if your generator isn’t fulfilling its function of producing power; all you need is to follow these steps to bring it into running condition.
Given the common reasons had been tripped breakers, poor magnetism, faulty AVR and worn brushes – these things should be addressed before moving into other technical interventions.
Information in this article foreign to you? -You can write in the comments section.
FAQs–Frequently Asked Questions
What does it mean to flash a generator?
It is a standby phase of generators when they are not working but the functional parts (AVR, brushes, breakers, outlets, etc. ) are intact. Without power, turn on the switch to dry the field using a drill or battery to re-energize or re-magnetize the field.
Brushless generator not producing power?
There can be reasons (omit)for you to unveil this problem